


How to Improve Your Instagram Photos
Are you happy with your Instagram marketing images? Looking for tips to improve your photos?
In this article, you’ll discover four tips to help you create better photos so you can stand out, drive more clicks, and generate more revenue.
Why Good Photography Matters on Instagram
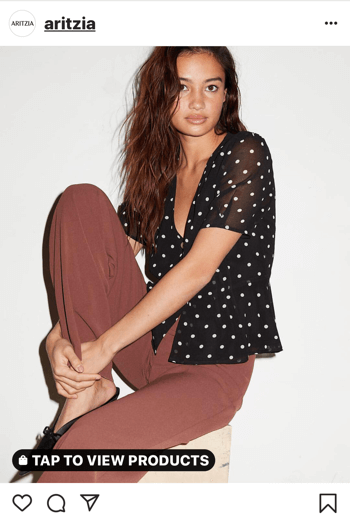
The imagery you’re posting to Instagram can help make or break your sales, especially if you’re relying on shoppable Instagram posts and stories to drive sales traffic.
Shoppable Instagram posts make shopping directly from your feed easy for your followers. Through shoppable posts, consumers are taken directly to various product pages on your website where they can easily purchase your products. TYME, a hair tools eCommerce shop, has seen a 44% increase in traffic from Instagram since integrating shoppable posts.

In 2018, Instagram expanded shoppable posts to include stories as well. Similar to shoppable posts, your followers can just tap the product they’re interested in while viewing your story and they’re sent to the product’s page on your website.

With a large number of consumers relying on social networks to help make purchase decisions, it’s important to showcase your products in the best possible way. Here are some tips to help you create better product images for use in your Instagram marketing.
#1: Choose a Visual Style
The first step to creating compelling product imagery is to understand your brand and the aesthetic that best suits it. While product photography focuses on featuring your wares, your brand’s personality needs to shine through in every photo you upload to Instagram and social media.
Take some time to think about what you want your Instagram feed theme to be. To help do this, go back and revisit your brand guidelines including your color palette, typography, logo, patterns, icons, and so on. This information will help guide your photography, and ultimately, the look of your Instagram photos.
Oh Happy Day Party Shop has a bright, colorful Instagram feed, likely stemming from a color palette with vivid colors.

If your brand has a more muted color palette, your feed may look more like that of Posh Little Cakes.

Once you’ve identified the aesthetic you want to achieve, it’s time to begin taking pictures of your products and experimenting with different elements.
Remember to Include Shots of Your Products From Different Angles
While purchasing items online is convenient for your customers, often the first time they’ll see the item they’ve purchased is when it’s delivered. Your product photos need to accurately depict your products to avoid confusion and limit returns.
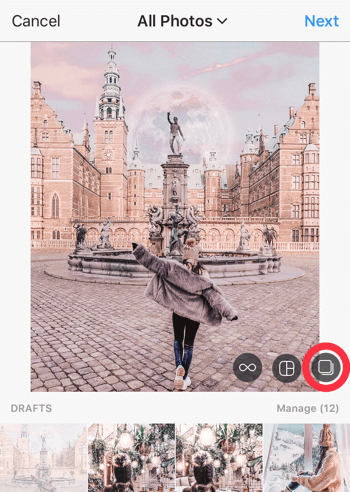
To add multiple photos to an Instagram post, simply click the icon circled below.
#2: Apply Proper Composition Techniques
Photo composition is how you arrange the visual elements in a photo. Good composition in a product photo will draw your viewer’s eye to your item. Here are four composition techniques that work particularly well for product photography.
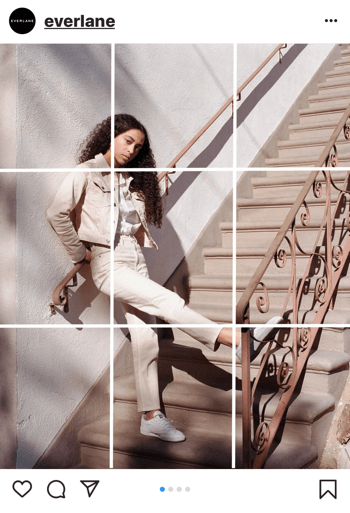
a.) Rule of Thirds:-
The rule of thirds is a foundational photo composition technique that you may already be familiar with. When composing your photograph, divide your image into thirds, both horizontally and vertically, and place your product where the lines intersect.
In this post, you can see how Everlane positioned the model where the dividing lines intersect.
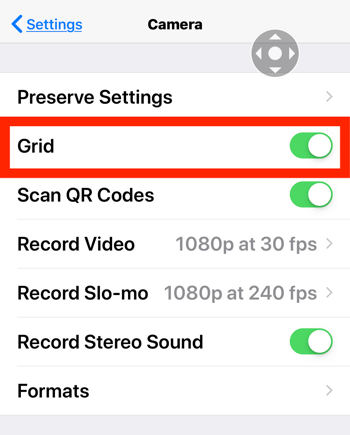
If you use an iPhone to take Instagram photos, you can turn on the Grid feature to see gridlines in the Camera app. To enable this feature, go to Settings > Camera > Grid.
You can also apply the rule of thirds to photos you’ve already taken. If you don’t like where the product is positioned, crop the photo so your product appears along the intersection of lines in the imaginary grid.
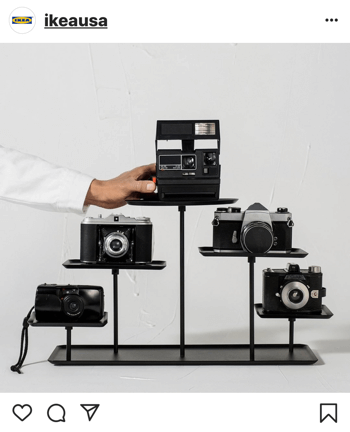
b.) Rule of Odds:-
Images tend to be more appealing when they include an odd number of objects. Imagine how different this photo from IKEA USA would appear without the fifth camera at the top and only the four below it.
c.) Negative Space:-
Negative space is the area that surrounds the subjects in a photograph. This composition technique can help you eliminate distractions and emphasize the products in your Instagram photos, helping draw the viewer’s eye to them.

d.) Centered Composition
Centered composition goes against the rule of thirds, but it can be an effective way to feature your products.
With this composition, you place your products in the center of the photo. Remember that less is more with this technique, so avoid busy backgrounds. You could also combine centered composition with negative space to achieve a balanced look.
#3: Adjust White Balance
A common mistake that amateur photographers make is not adjusting white balance. All too often, an otherwise great image is made unappealing by unwanted hues cast from light sources. Your camera’s flash may be making your whites appear bluer, and the sun or some indoor light sources might be giving the whites in your photos a yellow tinge.
Adjusting white balance is when you remove those unwanted hues and make the white “pure white” without any unwanted yellow (warm) or blue (cool) undertones.
The photo below has cool blue tones in the white. These undertones may be hard to notice at first, but if you take a piece of white paper and hold it next to the image, you’ll have an easier time picking up the blue.

Alternatively, the image below has warm undertones that need to be removed from the white.

You can adjust the white balance during the photo-editing process by using special software or apps. Popular desktop software options for improving the white balance in your Instagram photos include Lightroom CC and Photoshop CC. If you prefer to do your edits on mobile, try free apps like Adobe Lightroom CC (iOSand Android), Snapseed (iOS and Android), or VSCO (iOS and Android).
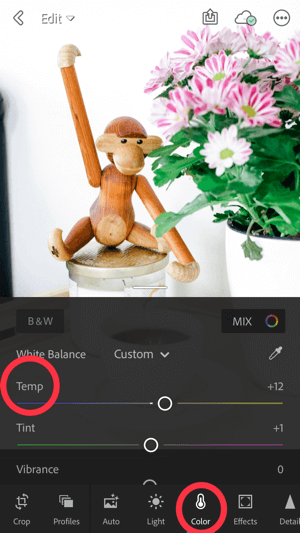
The Lightroom mobile app makes it easy to quickly correct white balance by adjusting the temperature of your picture.
If your image is too cool and contains blue undertones, dragging the temperature slider toward the yellow end of the scale, as shown below, can help correct any of those blue undertones.
Likewise, if the image is too warm (and has yellow undertones), dragging the slider toward the blue end of the scale can help cancel out the yellow.
Your image editing software may contain an autocorrect button to help you automatically adjust the white balance. While this feature can be handy when you’re first learning how to edit photos, don’t rely on it too much. Editing your images manually gives you more control and typically produces better results.
#4: Tweak Exposure
Image exposure is the amount of light in your photos.
When a photo is overexposed, as in the left image below, there’s too much light, which takes away detail and color and diminishes overall quality. In addition to overexposed images being unflattering, they’re typically more difficult to fix in the editing process. Often, some details simply can’t be recovered.

When a photo is underexposed, like the middle photo above, it’s too dark, resulting in a loss of color and details in the shadows. A properly exposed photo, like the image on the right, looks similar to how the scene would look in real life. Notice how the shadows and highlights seem natural.
Now that you understand what exposure is, let’s look at how you can adjust it before and after taking a photo.
a.) Adjust Exposure Before Taking a Photo
Ideally, you want to get as close to a proper exposure as you can when you take the photo.
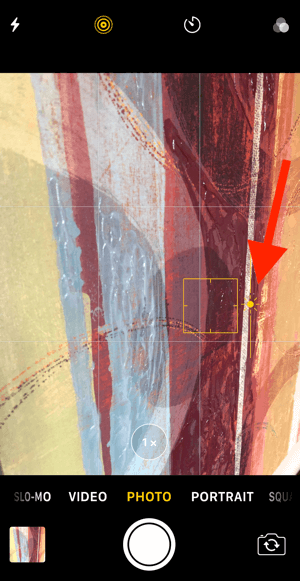
If you’re using the camera on your iPhone to shoot, first tap on the area of the scene you want to focus on. When you see the sun icon, drag your finger up or down on the screen to make the scene lighter or darker. Then take the picture.
If you’re using a point-and-shoot or DSLR to take Instagram photos, your camera’s automatic mode will help you set an appropriate exposure level. However, learning how to control the exposure manually can help you take your photos to the next level.
It’s helpful to shoot some test images and look at them to see if they’re too bright or too dark. From there, make adjustments as needed.
b.) Adjust Exposure in a Photo-Editing App
Mobile photography apps like Adobe Lightroom CC, VSCO, and Snapseed also allow you to adjust exposure after you’ve taken a photo.
With Snapseed, open the image you want to edit and then tap Tools at the bottom of the screen. In the Tools pop-up menu, select Tune Image.
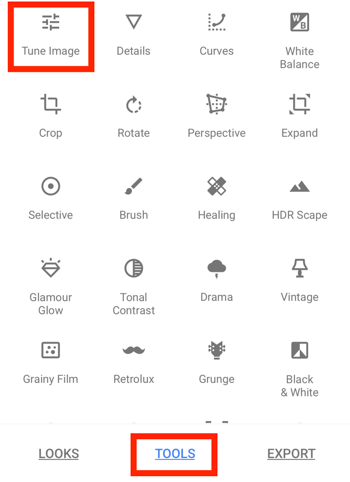
On the next screen, tap the second icon from the left on the toolbar and you’ll see a variety of controls you can tweak to improve your photo.
If you’re editing an over- or underexposed image, focus on these controls:
- Brightness: Brighten or darken the photo.
- Contrast: Increase or decrease the difference between the lightest and darkest parts of the photo.
- Highlights: Lighten or darken only the bright parts of the photo.
- Shadows: Lighten or darken only the dark parts of the photo.
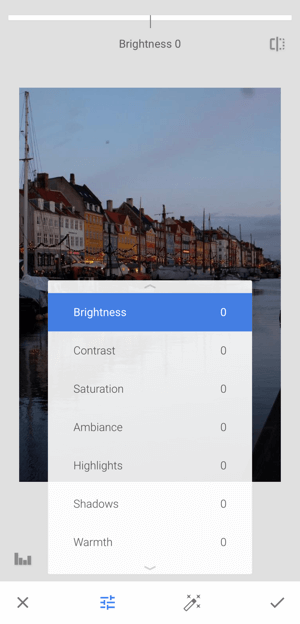
Select the control you want to adjust and then drag your finger to the left or right on the screen to make adjustments. As you drag your finger, you’ll see the effect on your image.
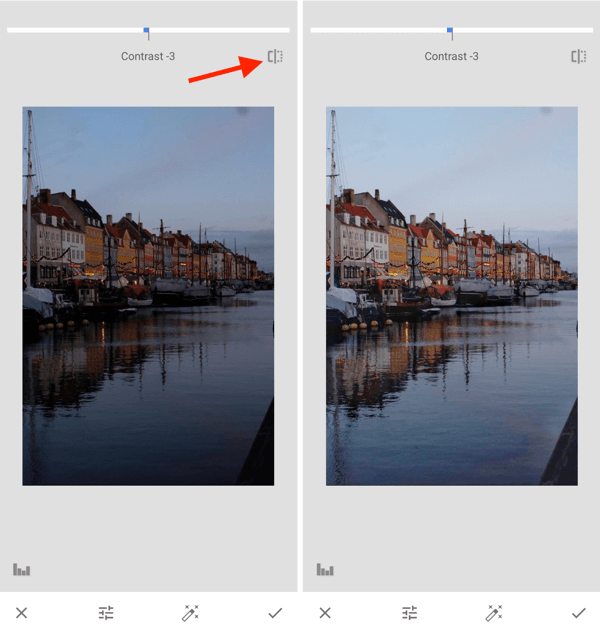
Tip: Tap and hold the icon in the upper-right corner of the screen to toggle between the original and edited image.
You’ll have to experiment with these controls to find the right combination of adjustments to achieve the results you want. When you’re happy with your edits, tap the checkmark icon to save your changes.
Conclusion
A great Instagram marketing photo has the potential to drive targeted and ready-to-buy traffic to your website. When you first begin to share product photos, you might feel a bit lost and unsure about what’s working. Test different techniques to see which types of photos result in the most sales and/or traffic to your website from your shoppable Instagram posts.
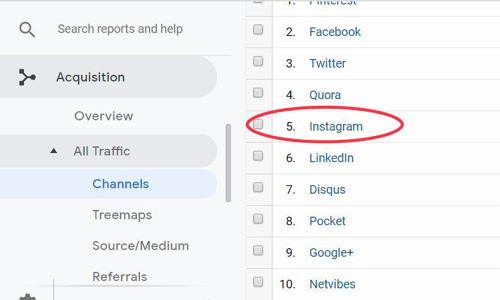
You can measure your traffic from Instagram in your Google Analytics. After you log in, go to Acquisition > All Traffic > Channels.
From there, you can select different channels for your traffic. In this case, click Social and then Instagram to see detailed analytics about your Instagram traffic.
If you have an Instagram business account, you can also track your analytics in the Instagram app through Instagram Insights. Each post and story has detailed insights that will help shape your understanding of whether your product photography is performing well with your audience.
Some significant metrics include:
- The number of likes a post receives
- The number of comments a post gets
- The number of users taking action on your post or stories (i.e., clicking on your shoppable posts, clicking on the link in your bio, swiping up, etc.)
Try to identify which Instagram photos perform best so you can replicate that success with future product photography.